


3D Printed Monogram: Project Overview
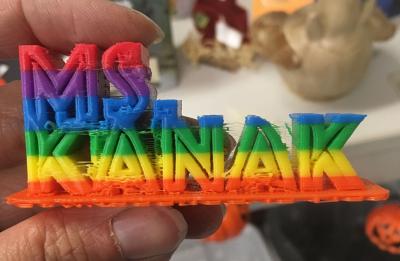
Submitted by: Breanne Kanak, White Lake School District
- Equipment Used: 3D Printer, Photoshop
- Time Required: One Week
For this project, students are given an overview of typefaces and type design. They are then required to create an alphabet with 26 original drawn characters to formulate a final design iteration. Students learn about additive and subtractive functions in Photoshop to edit their letter form. Students also utilize the 3D function in Photoshop to convert their letter form into an .obj file, ultimately sending that file to Makerbot for printing.
Scenario, Criteria and Constraints
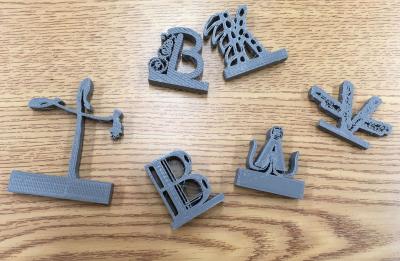
Students are asked to design their own 3D-printed monogram from their own initials or a favorite letter of the alphabet. In order to complete this project, students must create an original design for their letterform/monogram initial, engaging the following competencies:
- Proper use of Photoshop tools.
- Understanding of layer functions and significance.
- Correct use of drawing tools.
- 3D functions in Photoshop.
The monogram must conform to the size of the Z-axis. The dimensions of the letter(s) must fit within the constraints of the classroom Makerbot Replicator Mini build plate/area.
Project Steps:
- Open Photoshop.
- Create new document: 8.5 x 11 inch dimensions.
- Use the type tool to type a letter of your choice.
- Use the font selection tool to find a typeface that appeals to you.
- Change the size of your letter form to 300pt. This makes it easier to see the changes you make.
- Create a new layer. Title it "Paint Layer."
- When you switch to the paintbrush mode, the program will ask you if you want to RASTERIZE your type. Click "OK." You may use the paintbrush tool to create designs, drawings, patterns, logos, etc. Make sure your paint marks are only in black.
- Use your rectangle tool to create a base shape for your letter. Make it around the same width, or larger than, your typed letter
- Select your rectangle layer, paint layer, and type layer.
- MERGE these layers together. Click off of visibility for your background layer. We don’t need it anymore.
- 3D: Create new Extrusion from selected layer.
- Click on the object with the move tool. DO NOT MOVE OBJECT.
- Change extrusion depth to 100.
- Go to 3D and select “Export 3D Layer.”
- SAVE Model as a wavefront .OBJ file. Call it whatever you like!
- 3D export options. Click "OK."
- Open Makerbot Software.
- ADD FILE to workspace. Choose file from folder.
- SCALE OBJECT TO FIT.
- Scale Object Dimensions (X value) to 20mm.
- Select print preview. This lets you see how long your print will take to finish and the amount of layers/passes.
Learning Outcomes
This activity teaches students to use additive and subtractive functions in Photoshop to edit a letter form, utilize the 3D function in Photoshop to convert their letter form into an .obj file, and send a 3D file to Makerbot for printing.